Need to learn how to tie a tie or just add a few new knots to your arsenal? Our step-by-step tutorial is sure to tie your wedding fit together.
At some point we’ve all needed to know how to tie a tie. Whether it’s a refresher on how to tie a Windsor knot, or learning for the first time because you’ve finally decided to retire your old clip-on, knowing how to tie a tie properly is a vital tool to have in your sartorial pocket—especially if you have a wedding on the calendar (and don’t forget to learn how to tie a bow tie as well). Guests and grooms alike often need to put one on for the big occasion and there are a variety of different ways to do it. From classic Windsor knots to fancy and elegant tie knots, here’s everything you need to know when it comes to tying a necktie for a wedding.
TL;DR: The Easiest Way to Tie a Tie
In a rush? Don’t worry–there’s a tie knot for that. The easiest way to tie a tie is to go with a simple Windsor Knot, likely the one that comes to mind when you think of the word “tie.” It only takes a few simple steps and looks great with almost any suit.
Different Types of Tie Knots
There are a ton of different ways to tie a tie, varying in formality, style, and difficulty. What works best for you often comes down to the suit or shirt with which you’ll be wearing your tie. Ahead, we’re showing you the different techniques step by step, complete with pictures to help guide you through the process. Let’s tie one on.
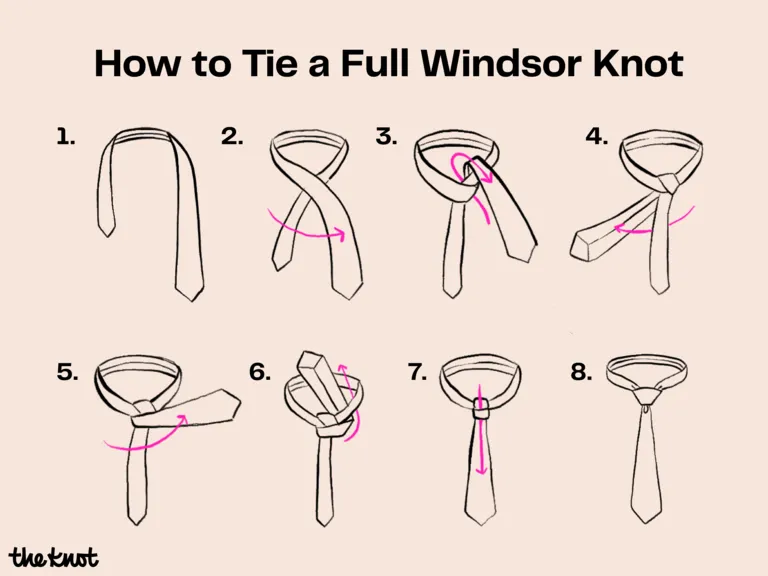
How to Tie a Full Windsor Knot
Featuring a polished triangular shape, this simple tie knot style offers a good option for job interviews, presentations and social occasions. Because of its wide appearance, this knot looks best with a spread-collar shirt. Although it may appear complicated, tying the full Windsor knot is accomplished without much difficulty.
Difficulty: Easy

Half Windsor Knot Steps
- Cross the wide part over the narrow part.
- Cross the wide part behind the narrow part so the wrong side is facing out.
- Bring the wide end up and over to the left.
- Pull it through the opening at the neck so it lays the wrong side out to the right.
- Bring the wide end over the narrow part from right to left with the correct side facing up.
- Bring the wide end up through the neck loop again.
- When bringing it down, insert it through the loop at the front of the collar.
- Adjust the knot by sliding it upward with one hand and holding the tails with the other.
- Lower the shirt collar to complete the look.
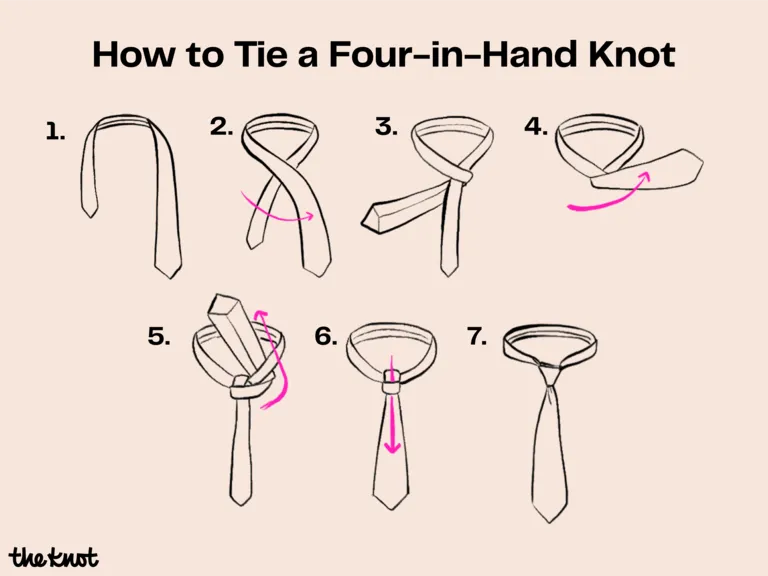
How to Tie a Four-in-Hand Knot
The four-in-hand knot works well for wide neckties in heavy fabrics. Learn how to knot a tie in this style if you’re hoping to dress up a traditional look. It looks most attractive when worn with a standard button-down dress shirt. With a few easy steps, people can tie the four-in-hand knot in a matter of minutes.
Difficulty: Easy

Four-in-Hand Knot Steps
- To complete this knot, raise the shirt collar and drape the tie around the neck so the wide end is on the right side and extends roughly 12 inches below the narrow end.
- Bring the wide part of the tie across the narrow part.
- Then bring the wide part under the narrow part.
- Bring the wide side back over the top of the narrow part.
- Bring the wide side up through the large loop at the neck.
- With a loose hold on the knot, insert the wide end in a downward direction through the loop in front.
- Holding the bottom narrow part of the tie with one hand, slide the knot upward with the other until neat and snug. Lower the shirt collar to complete the look.
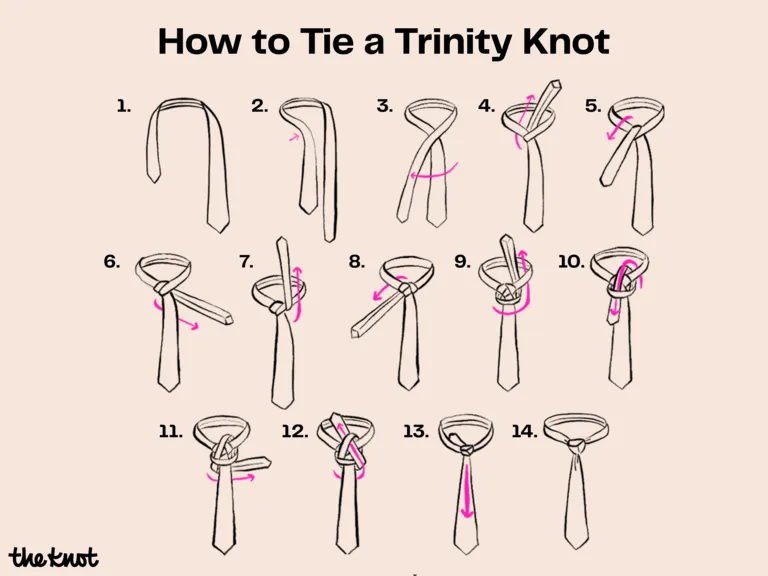
How to Tie a Trinity Knot
As you get more comfortable with the basics of how to tie a tie, you can graduate to more sophisticated options. The Trinity knot offers a stylish look patterned after the Trinity symbol. With a more complex design than the Windsor and four-in-hand knots, tying the Trinity knot is a little more complicated, but it makes a fashion statement for formal functions.
Difficulty: Medium

Trinity Knot Steps
- To tie the Trinity knot, raise the shirt collar and drape the tie around the neck with the wide edge hanging on the right side, just above the navel.
- Just below the collar, pinch the wide side of the tie long ways to form a dimple in the fabric.
- Take the thin part and cross it over the thick part.
- Bring the thin end up through the neck opening.
- Bring it back down toward the right side.
- Cross it under the thick part of the tie and to the other side, wrong side up.
- Bring the narrow end up.


Comments